It seems like last winter lasted longer than usual and I am more than ready for spring to appear. The grass is green and growing, the trees are blooming and the air smells of growing things. Must be time for spring classes to start!
There are only two seats left in the Flowers in Watercolor class, and 6 seats left in the Drawing class. The drawing class will be working on portraits in graphite, colored pencil, charcoal and watercolor. Plus we will be doing some figure drawing from a model, so it should be an interesting 7 weeks.
In the watercolor class we will be doing lots of beautiful flowers, crocus, daises, roses, peony, tree peony, iris and cherry blossoms. I thought is would be fun to learn to do some Chinese brush painting, thus the cherry blossoms and if there is time we may do another cat!
The last class we did in watercolor was of a jonquil and I was unable to get the series of how I did the painting on line, so I will do it here.
We start this painting by putting in the background first, a combination of ultramarine blue and alizarin crimson, to get it darker I added some paynes grey. Normally I paint the flowers first and then put in my background, I do that because it gives me a little more freedom with painting the flowers. When you put the background in first you are locked in on where the flowers and leaves are going to be. On this painting putting in the background first shows the shapes of the white flowers. I may go back in after the flowers are painted and darken some of the background even more if the composition needs it.

The jonquil is painted with two shades of yellow, we will be using the darker yellow for the outer petals of the flower. I did not wet the petal before putting on the paint, start at the base of the petal and pull the color out to the end of the petal, clean your brush in water, wipe all excess water out and pull some of the pigment off to give it some dimension. On these three petals you can see I pulled some color off to make it appear that there is a line down the center. Use the same technique you would use when you paint leaves. Remember too that you don't want to work on petals next to each other so the color doesn't bleed from one petal to the next.
You can see in this picture where I have pulled color out with a 1/4" flat damp brush to create lines.
The center photo shows that I have darkened up even more around the base of the petals using more pigment and less water. In the bottom photo you can see that the center has been painted with the lighter yellow then used the darker yellow in the center. When you are painting the lighter yellow in be careful to leave the out edge of the trumpet very light, pull out the color if need be. Leaving the edge light gives the center dimension. The darker shadows are purple made with ultramarine blue and alizarin crimson.
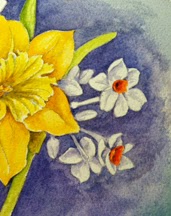
Now it's time to work on the paper whites. First paint the centers with a orange made with your dark yellow and cadmium red med. Remember it is a cup shape, so dark on one edge and then pull some of the color out of the center.
Do all of the centers, changing where the dark side of the cup is by which way the flower is facing. Flowers facing to the left will have the dark to the right, flowers facing to the right will have the dark side facing to the left. When you have done them all if you want to up the dark side add some cad red.
Now you can paint the stems and leaves, using sap green with yellow added to the lighter stems and ultramarine blue added for the darker areas.
For the shading in the white flowers you are going to use the same color as the background. For the lighter shadows add more water to the darker areas less water more pigment.
One of the last things I did on this painting is putting some of the background color in the orange centers to accent the cup shape. You want to make sure that the orange is dry before you put this in.
Here you can see the greens are all in and only the paper whites on top need to be finished.
This is the finished piece, you can see that I have darkened some of the background a bit more and punched up the darks in the petals.
The only thing left for you to do is sign your name!
The first painting we will be doing next week is of a group of crocus and here is the drawing. You can print it out and put it on your paper or I will have copies for the class.
Hope to see you in class!!


No comments:
Post a Comment